


ローカルプロキシツールと言えばBurp Suite
今回はローカルプロキシとして欠かすことのできないBurp Suite Free Edition v1.7.17についての全項目解説と便利な使い方について書いていきます。内容は大きく二つです。
①インストールから証明証の設定まで
②Burp Suite Free全項目解説と便利な使い方
③Burp Suite Freeを使った診断の計画と実施
ではまずは『①インストールから証明証の設定まで』から説明していきます。
①インストールから証明証の設定まで
Burp Suite Free Editionはここからダウンロード可能です。
ダウンロードできたら証明書取得に一旦Burp Suiteの起動が必要なのでダブルクリックで立ち上げます。(MacOSXでダウンロードしたらシステム環境設定>>セキュリティとプライバシーから開くとしましょう。)
まずはプロジェクト選択の画面がありますがFreeではTemporary以外選択不可なので右下のNextを押下しましょう。次の画面もそのままStart Burpを押下します。
8080ポートを使っていそうな場合、Proxy>>Optionsのタブを押下しProxy listenersの横のEditを押下しポートなどの設定を変更するといいでしょう。スマホはWifi経由なのでIPを設定しましょう。
localhost:8080(または自分で設定したBurp起動のIPとポート)にアクセス、
表示ページ右上部『CA Certificate』をクリックし証明書をダウンロードします。
落とした証明書をダブルクリックして使用ブラウザの信用できるルート証明書として設定します。
これでHTTPS通信の捕捉の準備が整いました。それでは次に『Burp Suite Free 1.7系全項目解説と便利な使い方』を見ていきましょう。
②Burp Suite Free全項目解説と便利な使い方
1.6系と1.7系ではUIの大きな『Project options』『User options』が分かれてログの設定がどこいった
Target
対象サイトの詳細情報を収集するsite mapの作成やターゲットとなるスコープを設定します。パス単位の除外設定も可能なのでパスで別サイトのなっているような構成のシステムで誤アクセスを未然に防ぐことができます。
英文の説明を開くThe Target tool contains the site map, with detailed information about your target applications. It lets you define which targets are in scope for your current work, and also lets you drive the process of testing for vulnerabilities.
Sitemap
サイト構造を記録しています。
英文の説明を開くThe site map aggregates all of the information that Burp has gathered about applications. You can filter and annotate this information to help manage it, and also use the site map to drive your testing workflow.
Target Information
The site map displays information about the contents and security issues that have been discovered in target applications. It lets you view the full requests and responses for individual items, and the full details about discovered issues.
Site Map Views
The left-hand-side tree view contains a hierarchical representation of content, with URLs broken down into domains, directories, files, and parameterized requests. You can expand interesting branches to see further detail. If you select one or more parts of the tree, the relevant details about all the selected items and items in child branches are shown in the right-hand-side view.
The icons in the tree view also provide a visual indication of the most significant security issue that has been identified within each branch or item.
The right-hand-side view contains details of both the contents and discovered issues for the items selected in the tree view. The contents and issues can be displayed within separate sub-tabs or in a left/right split.
Note: You can configure your preferred view via the View sub-menu on the context menu.
You can pop up a new site map window, based on the same underlying data, using the “Show new site map window” option on the context menu. You can use the new window to display and monitor a different selection of target items. You can also apply a different display filter.
Contents View
The site map aggregates all of the content that Burp has observed in applications. This includes:
- All of the resources that have been directly requested via the Proxy.
- Any items that have been inferred by analyzing the responses to proxy requests (provided you have not disabled passive spidering).
- Content discovered using the Spider or content discovery functions.
- Any items manually added by the user, from the output of other tools.
Items in the site map that have been requested are shown in black. Items that have not yet been requested are shown in gray. By default (with passive spidering enabled) when you begin browsing a typical application, a large amount of content will appear in gray before you even get as far as requesting it, because Burp has discovered links to it in the content that you have requested. You can remove uninteresting content (for example, on other domains that are linked to from your target application), by setting an appropriate target scope and using the site map display filter.
The contents table shows key details about each selected item (URL, HTTP status code, page title, etc.). You can sort the table according to any column (click the column header to cycle through ascending sort, descending sort, and unsorted). If you select an item in the table, the request and response (where available) for that item are shown in the request/response pane. This contains an HTTP message editor for the request and response, providing detailed analysis of each message.
Issues View
The issues view of the site map shows the issues that Burp Scanner has identified for the selected items, based on both active and passive scanning. If you select an issue, the relevant details are displayed, including:
- A customized vulnerability advisory containing:
- A standard description of the issue type and its remediation.
- A description of any specific features that apply to the issue and affect its remediation.
- The full requests and responses that were the basis for reporting the issue. Where applicable, the parts of the request and response that are relevant to identifying and reproducing the issue are highlighted in the request and response message editors.
- Details of any interactions with the Burp Collaborator server that were the basis for reporting the issue.
Often, the fastest way to reproduce and verify an issue is to use the context menu on the message editor to send the request to Burp Repeater. Alternatively, for GET requests, you can copy the URL and paste it into your browser. Then you can reissue the request, and if necessary fine tune the proof-of-concept attack that was generated by Burp.
Every issue that Burp Scanner reports is given a rating both for severity (high, medium, low, informational) and for confidence (certain, firm, tentative). When an issue has been identified using a technique that is inherently less reliable (such as for blind SQL injection), Burp makes you aware of this, by dropping the confidence level to less than certain. These ratings should always be interpreted as indicative, and you should review them based on your knowledge of the application’s functionality and business context.
The issues view has a context menu that you can use to perform the following actions:
- Report selected issues – This starts Burp Scanner’s reporting wizard, to generate a formal report of the selected issues.
- Set severity – This lets you reassign the severity level of the issue. You can set the severity to high, medium, low, or informational. You can also flag the issue as a false positive.
- Set confidence – This lets you reassign the confidence level of the issue. You can set the confidence to certain, firm or tentative.
- Delete selected issues – This deletes the selected issues. Note that if you delete an issue, and Burp rediscovers the same issue (for example, if you rescan the same request), then the issue will be reported again. If instead you mark the issue as a false positive, then this will not happen. Therefore, deletion of issues is best used for cleaning up the scan results to remove hosts or paths you are not interested in. For unwanted issues within the functionality you are still working on, you should use the false positive option.
Display Filter
The site map has a display filter that can be used to hide some of its content from view, to make it easier to analyze and work on the content you are interested in.
The filter bar above the site map describes the current display filter. Clicking the filter bar opens the filter options for editing. The filter can be configured based on the following attributes:
- Request type – You can show only in-scope items, only requested items, only requests with parameters, or you can hide not-found items.
- MIME type – You can configure whether to show or hide responses containing various different MIME types, such as HTML, CSS, or images.
- Status code – You can configure whether to show or hide responses with various HTTP status codes.
- Folders – You can optionally hide empty folders in the tree view. This is useful to remove folders whose child items have all been hidden by other display filter attributes.
- Search term – [Pro version] You can filter on whether or not responses contain a specified search term. You can configure whether the search term is a literal string or a regular expression, and whether it is case sensitive. If you select the “Negative search” option, then only items not matching the search term will be shown.
- File extension – You can configure whether to show or hide items with specified file extensions.
- Annotation – You can configure whether to show only items with user-supplied comments or highlights .
The content displayed within the site map is effectively a view into an underlying database, and the display filter controls what is included in that view. If you set a filter to hide some items, these are not deleted, only hidden, and will reappear if you unset the relevant filter. This means you can use the filter to help you systematically examine a complex site map to understand where different kinds of interesting content reside.
Note: If you often use different display filters, you can pop up additional site map windows (using the “Show new site map window” option on the context menu), and apply a different display filter to each window.
Annotations
In the contents table view, you can annotate items by adding comments and highlights. This can be useful to describe the purpose of different URLs, and to flag up interesting items for further investigation.
You can add highlights in two ways:
- You can highlight individual items using the drop-down menu on the left-most table column.
- You can highlight one or more selected items using the “Highlight” item on the context menu.
You can add comments in two ways:
- You can double-click the relevant entry, within the Comment column, to add or edit a comment in-place.
- You can comment one or more selected items using the “Add comment” item on the context menu.
When you have annotated interesting requests, you can use column sorting and the display filter to quickly find these items later.
Testing Workflow
As well as displaying all of the information gathered about your target, the site map enables you to control and initiate specific attacks against the target, using the context menus that appear everywhere. The exact options that are available depend on the location where the context menu was invoked, and the type of item(s) selected. The complete list of context menu actions is as follows:
- Add to / remove from scope – These options create new target scope rules which add or remove the selected item(s) from scope. The rule generated will apply to the selected item and all child branches in the tree. A common technique when testing an application that includes some sensitive URLs is to add the whole application path (domain or directory) to the target scope, and then select the sensitive items and exclude them from scope.
- Scan / Spider / Send to … – You can send any item to other Burp tools, to perform further attacks or analysis. The ability to send requests between tools forms the core of Burp’s user-driven workflow . For example, you can select a host or folder within the tree view, and perform actions on the entire branch of the tree, such as spidering or scanning. Or you can select an individual item anywhere, and send the request to other Burp tools, such as Intruder or Repeater.
- Show response in browser – You can use this to render the selected response in your browser, to avoid the limitations of Burp’s built-in HTML renderer. When you select this option, Burp gives you a unique URL that you can paste into your browser (configured to use the current instance of Burp as its proxy), to render the response. The resulting browser request is served by Burp with the exact response that you selected (the request is not forwarded to the original web server), and yet the response is processed by the browser in the context of the originally requested URL. Hence, relative links within the response will be handled properly by your browser. As a result, your browser may make additional requests (for images, CSS, etc.) in the course of rendering the response – these will be handled by Burp in the usual way.
- Request in browser – You can use this to re-issue the selected request in your browser (configured to use the current instance of Burp as its proxy). The following sub-options are available:
- In original session – This causes Burp to issue the request using the exact Cookie header that appeared in the original request.
- In current browser session – This causes Burp to issue the request using the cookies supplied by your browser. You can use this feature to facilitate testing of access controls, by selecting requests within Burp that were generated within one user context (e.g. an administrator), and reissuing the requests within a different user context that you are now logged in as (e.g. an ordinary user). When you are dealing with complex, multi-stage processes, this methodology, of manually pasting a series of URLs from Burp into your browser, is normally a lot easier than repeating a multi-stage process over and over, and modifying cookies manually using the Proxy.
- Engagement tools – [Pro version] This submenu contains various useful functions for carrying out engagement-related tasks:
- Search – [Pro version] You can use the Search function to search the selected branch(es) of the site map for items matching a specific expression.
- Find comments / scripts – [Pro version] You can use the Find comments / scripts functions to search the selected branch(es) of the site map for comments and scripts.
- Find references – [Pro version] You can use the Find references function to search all of Burp’s tools for HTTP responses that link to the selected item.
- Analyze target – [Pro version] You can use the Target Analyzer function to analyze the selected branch(es) of the site map and tell you how many static and dynamic URLs it contains, and how many parameters each URL takes.
- Discover content – [Pro version] You can use the Discover content function to discover content and functionality that is not linked from visible content which you can browse to or spider.
- Schedule task – [Pro version] You can use the Schedule task function to create tasks that will run automatically at defined times and intervals.
- Generate CSRF PoC – [Pro version] You can use the Generate CSRF PoC function to create some HTML which, when viewed in a browser, will cause the selected request to be issued.
- Simulate manual testing – [Pro version] The Manual testing simulator can be used to generate HTTP traffic that is similar to that caused by manual penetration testing.
- Compare site maps – You can use the Compare site maps function to identify differences between two site maps. This is a powerful feature that can be used for various purposes, in particular testing for access control vulnerabilities.
- Add comment – You can use this function to add a comment to the selected table item(s). See Annotations for more details.
- Highlight – You can use this function to apply a highlight to the selected table item(s). See Annotations for more details.
- Expand / collapse branch / requested items – You can use these functions in the tree view to quickly expand whole branches of the tree, and collapse them after you have reviewed them.
- Delete item(s) – This function removes the selected item(s) permanently. Since by default the site map displays all content that Burp has identified based on HTTP responses, the map will often include a large amount of third-party content that is linked to from the application you are interested in. You can deal with this either by configuring a suitable target scope and a display filter, or by manually removing irrelevant branches of the tree.
- Copy URL(s) – This function copies the URL(s) of the selected item(s) to the clipboard.
- Copy as curl command – This function copies to the clipboard a curl command that can be used to generate the selected request.
- Copy links – This function parses the selected item(s) for links, and copies these to the clipboard.
- Save item(s) – This function lets you specify a file to save the details of selected item(s) in XML format, including full requests and responses, and all relevant metadata such as response length, HTTP status code and MIME type.
Scope
対象とする範囲(スコープ)を設定します。設定するとProxy historyやTarget site mapでの表示内容のフィルタや、インターセプトするリクエスト・レスポンスの実行範囲を制限できます。この設定により、誤ってほかの環境へアクセスするミスを抑制します。
英文の説明を開くThe target scope configuration lets you tell Burp, at a suite-wide level, exactly what hosts and URLs constitute the target for your current work. You can think of the target scope as, roughly, the items that you are currently interested in and willing to attack.
Proxy
ブラウザとWebサーバの間でリクエストやレスポンスを仲介し、内容変更などの制御を行います。
英文の説明を開くBurp Proxy lies at the heart of Burp’s user-driven workflow, and lets you intercept, view and modify all requests and responses passing between your browser and destination web servers.
Intercept
リクエストをInterceptして値の変更はもちろん、上の方の鉛筆マークをクリックして送信先ホストの書き換えも可能です。
Interceptで変更を行うとEditedの列にチェックが入ります。
また、意図的にドロップ(Drop)することで以下のような手順でCSRFの診断を行うことも可能です。
CSRF Tokenの検証などが行えます。Aユーザのトランザクション処理をInterceptリクエストをコピーしたら、Drop、Bユーザのトランザクション処理でIntercept、さっきコピーしたリクエストのTokenを張り付けて送信としたときユーザプロセスとユーザセッションがしっかりリンクしているか検証することができます。
英文の説明を開くThe Intercept tab is used to display and modify HTTP and WebSockets messages that pass between your browser and web servers. The ability to monitor, intercept and modify all messages is a core part of Burp’s user-driven workflow. In Burp Proxy’s options, you can configure interception rules to determine exactly what HTTP requests and responses are stalled for interception (for example, in-scope items, items with specific file extensions, requests with parameters, etc.). You can also configure which WebSockets messages are intercepted.
HTTP history
Filterの部分をクリックすると表示設定が行えます。400番台は出したくないとか。CSSやimageも出力したいなど(大量に出ることが多いので注意しましょう)の設定が可能です。
Highlightで色を付けて着目したい通信が埋もれないようにしておくと安心です。
WebSockets history
HTTP historyのWebSokets版です。
Options
Proxy Listeners
起動の度に初期に戻ります。(127.0.0.1:8080)8080はぶつかるサービスが多いので私は9090とかに設定しています。
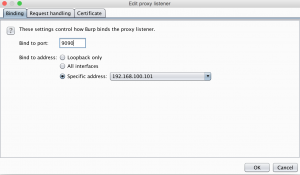
チェックが入らないときは二重に立ち上がっているなどそのポートが使用中である場合が多いです。
Import/export CA certificate
cerやcrtの証明書が欲しい時、空のテキストに名前をつけてexportすることで作成可能です。
Regenerate CA certificate
Spider
Burp Suiteのスパイダーを利用して、Webアプリケーションのリンク、コンテンツ等を自動的に収集できます。これによって、診断(検査)対象のWebアプリケーションの全体像を把握することが可能です。
英文の説明を開くBurp Spider is a tool for automatically crawling web applications. It uses various intelligent techniques to generate an inventory of an application’s content and functionality.
Scanner(有償)
ツールスキャンを行います。False Positiveなので敢えて取りこぼしのないように過剰検知します。
Intruder
この機能で、様々な診断(検査)を実施するために利用します。例えば、Webアプリケーションに対するファジングやブルートフォース攻撃です。
英文の説明を開くBurp Intruder is a powerful tool for automating customized attacks against web applications. It can be used to automate all kinds of tasks that may arise during your testing.
Target
Positions
1. Sniper
positionで指定した箇所に対して、Payload Optionsで設定した値を1つずつ変更して送信します。
2.Battering ram
positionで指定した箇所を、Payload Optionsで設定した値に一括変更して送信。
3.Pitchfork
positionで指定した箇所ごとに、Payload Optionsで値を設定して送信。
Cookie: PHPSESSID=§sdjg7p2nuvt768clu0dr5nki32§
name=§test§&address=§test§があった場合、PHPSESSID,name,addressごとに
変更するものを設定
4.Cluster bomb
positionの一つを固定しながら他を変えるの順繰り設定していきます。
position1のPayload Optionsの値を「1, 2」position2のPayload Optionsの値を「a, b」と設定した場合、
実行時にまずposition1の「1」が固定された状態で、position2が「a, b」となって送信。
次にposition1が「2」で固定され、position2の「a, b」が送信されます。
Repeater
Webアプリケーションに対するリクエストを編集し、繰り返し実行する機能です。このリクエストに対するレスポンスを分析してWebアプリケーションの詳細を分析し診断(検査)を実施します。応答時間の計測も行えます。
Targetはsend to Repeaterで送った場合は設定不要です。
応答時間の計測を利用してDos系の診断を行うことができます。
英文の説明を開くBurp Repeater is a simple tool for manually manipulating and reissuing individual HTTP requests, and analyzing the application’s responses. You can send a request to Repeater from anywhere within Burp, modify the request and issue it over and over.
Sequencer
Webアプリケーションのセッションの推測しやすさを診断(検査)
Burp Sequencer is a tool for analyzing the quality of randomness in a sample of data items. You can use it to test an application’s session tokens or other important data items that are intended to be unpredictable, such as anti-CSRF tokens, password reset tokens, etc.
Decoder
エンコードされた文字列を復号する機能です。これによって、エンコード文字列を悪用した脆弱性の検査を実施します。Smart Decodeが便利です。
英文の説明を開くBurp Decoder is a simple tool for transforming encoded data into its canonical form, or for transforming raw data into various encoded and hashed forms. It is capable of intelligently recognizing several encoding formats using heuristic techniques.
Comparer
2つのリクエスト及びレスポンスを比較する機能です。検査を深堀していく際に役立つ機能です。
英文の説明を開くBurp Comparer is a simple tool for performing a comparison (a visual “diff”) between any two items of data. Some common uses for Burp Comparer are as follows:
- When looking for username enumeration conditions, you can compare responses to failed logins using valid and invalid usernames, looking for subtle differences in the responses.
- When an Intruder attack has resulted in some very large responses with different lengths than the base response, you can compare these to quickly see where the differences lie.
- When comparing the site maps or Proxy history entries generated by different types of users, you can compare pairs of similar requests to see where the differences lie that give rise to different application behavior.
- When testing for blind SQL injection bugs using Boolean condition injection and other similar tests, you can compare two responses to see whether injecting different conditions has resulted in a relevant difference in responses.
Extender
BApp Storeや独自の拡張プログラムを制御します。
英文の説明を開くBurp Extender lets you use Burp extensions, to extend Burp’s functionality using your own or third-party code. You can load and manage extensions , view details about installed extensions, install extensions from the BApp Store, view the current Burp Extender APIs, and configure options for how extensions are handled.
Project options
Projectに関するオプションを設定します。
User options
UIなどBurp Suiteの実行環境に関するオプションを設定します。
Connection
Platform Authentication
ホストごとの認証(Basicとか)を管理できます。
Upstream Proxy Server
Burp Suiteから出た後の向き先を指定します。
SOCKS Proxy
Alerts
エラーメッセージなどを出力します。
③Burp Suite Freeを使った診断の計画と実施
診断前の準備
まず大前提ですが、アクセスの影響が及ぶ全ての範囲に対し許可の得た環境でのみ診断は許可される行為です。
レンタルサーバもあくまでも区分として借り受けた部分なので、マンションで近所迷惑を考える以上にしっかり
許可を得た上で行いましょう。では実際に手順に入ります。
STEP1 スコープの登録
セッションが切れたり、ログアウトするとアクセス禁止の本番環境なんてこともしばしばなので範囲外の処理を実施しないよう事前のヒアリングにより対象として良いHost(とパス)に対してScopeの設定を行います。
履歴(history)から登録対象を右クリック、コンテキストメニューから『Add to scope』でScopへ追加されます。
①ScopeにてInclude in scope内の設定が正しいか確認します。
Editで正規表現が指定可能なので特定パスへの一致を条件にすることも可能です。
Exclude in scopeにより除外の方のしてもかのうなのでうまく組み合わせましょう。
②Site map にてFilter by request typeをShow only in-scope itemsに設定します。
Proxyにも同じような設定がりますがSite mapと間違わないようにしましょう。
STEP 2 ログの記録の設定
Project Option>Miscをクリックします。するとLoggingという項目が見つかるので特に理由がない限りALL Toolsのrequest/responsの両方にチェックをつけましょう。
そもそもログを残す、証跡を残すのは前提ですが、問題発生時の原因究明やあらぬ疑いをかけれた時に強い味方であることを理解して無意識にログ設定ができるよう習慣付けましょう。
入力値反映の対象を見極める
入力値反映の対象を見極めることで確認すべき脆弱性を把握することができます。
1.ブラウザ(レンダリング/JavaScriptエンジン)への反映
→CRLFインジェクション・スクリプトインジェクション(XSS)・フレームインジェクション
2.データベースへの反映
→SQL(HoSQL)インジェクション・LDAPインジェクション
3.シェルへの反映
→OSコマンドインジェクション(ClassLoader/Shell Shockなど)
4.メール
→メールヘッダインジェクション
⒌クッキーへの反映
→クッキーアダプション・セッションフィクセーション
6.ファイル処理への反映
→パストラバーサル・ファイルインクルーション
7.パラメータ処理
→パラメータマニュピレーション
1.ブラウザ(レンダリング/JavaScriptエンジン)への反映|CRLFインジェクション・スクリプトインジェクション(XSS)・フレームインジェクション
ブラウザは大きくレンダリングエンジンとJavaScriptエンジンから出力反映を行いますが、
ブラウザアプリケーションにより採用されるエンジンが異なるため、
特にスクリプトインジェクションにおいて影響が発生するもの発生しないものに差異が生まれることに注意しましょう。
| ブラウザ | レンダリングエンジン | JavaScriptエンジン |
|---|---|---|
| IE | Trident | Chakra |
| Chrome | Blink | V8 |
| Opera | Blink | V8 |
| Safari | WebKit | JavaScriptCore(Nitro) |
| PhantomJS | WebKit | JavaScriptCore(Nitro) |
| Firefox | Gecko | SpiderMonkey |
ブラウザ依存のクロスサイトスクリプティングで言えば
<q/oncut=alert() 対応ブラウザ:GoogleChrome
<body language=vbs onload=alert-1 対応ブラウザ:IE6 IE7 IE8 IE9 IE10
<input type=”hidden” accesskey=”X” onclick=”alert(1)”>対応ブラウザ:FireFox (SHIFT+ALT+X キーを押下で発動)
などが有名です。
メタ文字の処理を見てその時点でスクリプト評価されるかが観点です。
例えば、『 ‘ 』などを実体参照へエンコードし『'』と処理する方法での対策が存在しますが、
inputタグのvalue属性の中ではメタ文字として評価されませんが、イベントハンドラ内では評価されるため
onClick(‘');alert('‘);などと出力がなっていると挿入された文字がスクリプト評価できるため、
スクリプトが動作してしまいます。
またバイナリセーフでない検証を用いている場合、ヌルバイト文字を用いて検証をバイパスできる可能性があるため
%oo<script>alert()<script>
なども検証しましょう。またXSS=alert()をあげるような誤解を招いている側面があるので
alert()でなくconfirm()などとするだけで簡単にあがったりするケースもあるため特定文字列のみの対策になっていないかという点も考慮に入れるべきです。
2.データベースへの反映|SQL(HoSQL)インジェクション・LDAPインジェクション
SQL構文破壊による挙動の差異の確認 ①元値②元値’③元値’||’④元値’|||
Repeaterを用いて確認し、レスポンスをComparerを用いて影響箇所を確認してみましょう。
SQL特殊文字へのエスケープ漏れとしてはワイルドカード文字列、コメント文字へのエスケープが見逃しやすい点なので注意しましょう。
3.シェルへの反映|OSコマンドインジェクション(シェルコマンドClassLoader/Shell Shockなど)
System関数で入力値を受けている場合、以下の文字列でパスワードを記録されてしまいます。
echo ../../etc/passwd > sample.txt
4.メール|メールヘッダインジェクション
CRLFインジェクション、つまり改行挿入ができた時点で、送信先の不正な追加、不正なファイルの追加や本文改変などの可能性が出てきます。
⒌クッキーへの反映|クッキーアダプション・セッションフィクセーション
改行コードを挟めると不正なクッキーをセットできる可能性があります。
%0d%0aSet-Cookie:session_id%3dxxxxx
6.ファイル処理への反映|パストラバーサル・ファイルインクルーション
パス指定文字の挿入の観点も重要ですがfile=exploit.php%00.jpegなどとヌル文字で終端させるという観点も持ちましょう。
7.パラメータ処理|パラメータマニュピレーション
昨今騒がせているWordpress4.7.1の脆弱性(URLパス/1?id=1A で無認可で投稿される)などもこれにあたります。
パラメータのハンドリングミスでコンテンツの制限に不備がないかを確認します。
1でONになっていれば0でOFFじゃないか?などCompareなどを利用し権限やユーザの違う場合の
パラメータ差異とレスポンス差異に着目すると良いヒントを得られる可能性があります。
以上です。Burp Suiteはこれからも付き合いの長いツールなので
気づいたことがあれば随時このページに追記していきます、
皆さんのお役に立てれば幸いです。